Using
The Rembo Wizard for Windows
2000 Cloning
Problem description
The organization has been delivered a batch of PC computers, in this
example twenty PCI-bus computers manufactured by ICS. The system is
delivered with a Windows 2000 Professional license, and all systems are
delivered pre-installed. The task is to install few of these machines for
the development team, which will prepare a reference system. The reference
system is then to be cloned in the process control system with the rest of
the batch.
Task description
The task is similar to the cloning based installation of the office
computers, only that an independent development team prepares the
reference installation and that we can use group level cloning techniques
instead of host level cloning (in this particular control system, the
systems will be placed on a dedicated 100 Mbit/s, switched Ethernet).
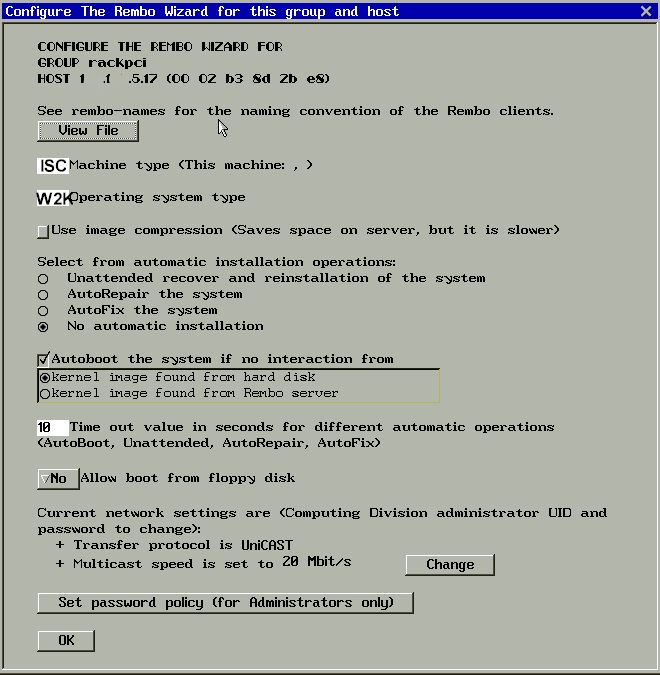
Declare the reference system on DHCP Server and on Rembo Server
 When
the reference system boots with
The Rembo Wizard, you would need
to give initial configuration. In this example, the System Type is "IPC"
and the OS Type is "W2K" for Windows 2000. It is to be noted also that the
system is located in a 100 Mbit/s, switched Ethernet segment with a 1 GB
backbone. Therefore the network protocol is Unicast and we use the
transfer speed setting of max. 20 Mbit/s. In the final production system
we will use Multicast, transfer speed remaining at max. 20 Mbit/s. Now
boot the original installation from the hard disk When
the reference system boots with
The Rembo Wizard, you would need
to give initial configuration. In this example, the System Type is "IPC"
and the OS Type is "W2K" for Windows 2000. It is to be noted also that the
system is located in a 100 Mbit/s, switched Ethernet segment with a 1 GB
backbone. Therefore the network protocol is Unicast and we use the
transfer speed setting of max. 20 Mbit/s. In the final production system
we will use Multicast, transfer speed remaining at max. 20 Mbit/s. Now
boot the original installation from the hard disk
 
Configure the Windows 2000 installation into your organization's standards
Your organization may have some generic setup rules for the basic
installation, additional software to install and so on. Most important of
all, make sure that the TCP/IP identity of the machine is configured for
DHCP. If your organization's rules do not allow this, too bad for you -
group level cloning cannot be used.
Analyze the partition table of the actual installation
As with most manufacturers, the reference system is delivered on a one
single "C:" partition that uses the entire 20 GB IDE disk. Nothing
wrong with this but
-
The Rembo Wizard is designed to
back up only the first partition
-
The Rembo Wizard is intended to
be used only for system level backups
- If the user data is all installed on the first, "C:" partition it
will be included in the backups taken with
The Rembo Wizard. This will make
it impossible to use the image together with
The Rembo Wizard for cloning
based installation. Also it would increase the time needed for the backups and
the disk size requirements on the Rembo Server.
Therefore we plan to divide the existing installation to a 4 GB "C:"
partition and to a 14 GB "E:" partition. This would leave about
2 GB at the end of the disk for the future, production installations,
where we will use Multicast transfer protocol, requiring a disk cache
space.
Uncompress and decprypt all the files of the original installation
The OEM installed Windows 2000 in our example is installed on a NTFS
partition. The installation contains a quite a few compressed files and
probably some files that are encrypted. Rembo Toolkit is not capable to access
these files. Therefore all files in the system should be uncompressed and
decrypted before taking the initial backup with
The Rembo Wizard. Open a console
window with a prompt and give following commands.
cd \
compact /u /a /s /i
cipher /d /a /i /f /h /s:C\
exit
Make also sure that all the temporary directories are empty, Internet
temporary files are removed and that the recycle bin is empty (use
administration cleaning tools). Make sure that before you reboot the system, all
the windows - such as Explorer - are closed and that all user tasks are stopped.
Take the base image of the reference installation
Reboot the Windows 2000 and when stop
The Rembo Wizard's automatic
hard disk booting by pressing

Supposedly there is no base images yet to the new system, so the first image
taken will be the base image. Put the image on the group level.
Replace the target system with an other machine from the batch
As a precaution, when more than one type of target machines is available it
is better to test the base image on an other machine of the batch. This will
leave us an opportunity to make adjustments on the base image and take
differential images from the references system with added features.
Repartition the hard disk
WARNING: From this point on, there is no return! As
an experienced system administrator you certainly do understand the
potential risks of the following procedure which erases all the
information from the disk.
It is good idea now to reboot the computer.
Since we are going to change the partition table of the system it is
better to make sure that there is no open file handles hanging around in
the Rembo OS.
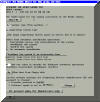
Otherwise an error message like
 would
appear somewhere on the line. would
appear somewhere on the line.
Once booting, stop
The Rembo Wizard's automatic
hard disk booting and start the Rembo Toolkit's partition manager by
pressing
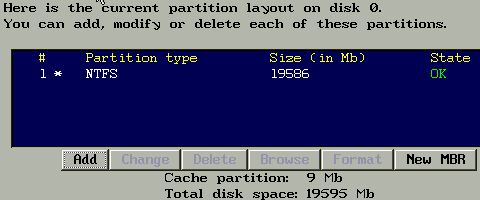
As you can see, the entire 20 GB disk of our example is allocated as "C:".
Click on the partition line to select it and press Delete button.
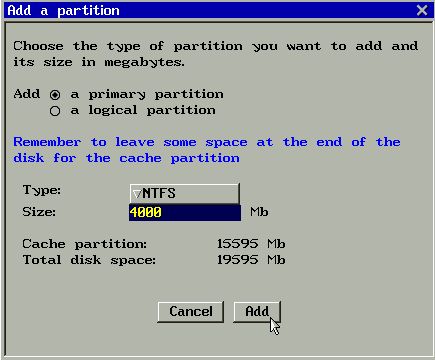
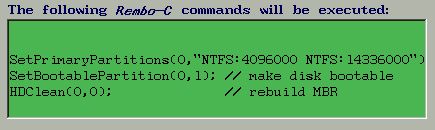
Use the Add button to create a new
partition table. Note that all partitions will be primary partitions on
the first partition table of the disk. Do not use logical partitions.
Below is the resulting partition table.
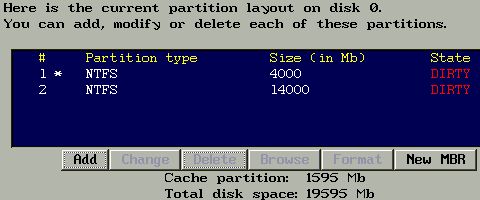
Press now the Commit button on the Rembo Toolkit's partition
manager to write the partition table on the disk. It will show us what
commands you could have given yourself in the Interact-window. It is
noteworthy to observe that also the master boot record will be cleaned in
the process. Press Do It !
Click on Done to leave the Rembo Toolkit's partition manager. You
can then revisit the partition manager in order to see what are the
actual sizes of each partition; depending of the disk geometry and
cluster size, it is rather rare to see that you can get exactly the values
in MB that you have requested.
Register the new partition table signature
We have changed the partition table of the cloned system but not the
partition table of the reference system. In order to register on the Rembo
Server what we have done with the partition table, we will register the new partition table signature into the autoload-file
of the host.
Make your way back to
The Rembo Wizard's main menu and
re-enter the configuration of the host.
You may see the following type of warning message if the reference system's
partition table has been registered as the partition table signature for this
host. Answer Yes to register the new partition table signature.
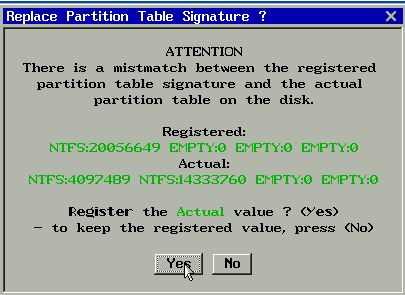
In the following configuration
dialog, do not forget to press OK to store the new partition table
signature into the autoload-file of the host.
What this operation is good for ? You can store the autoload-file
of this host for cloning purposes. For each new host that you
install, create the MAC-address named directory in the host scope of the
Rembo Server's file system. Then copy the new, reference autoload-file
into that directory. Now you would
- Edit the autoload file and set the Unattended installation
flag true.
- Start the new system, and the system gets installed automagically. You
do not even need to connect screen, mouse or keyboard if you like.
- Edit the autoload file and set the Unattended installation
flag false.
Install the system from the reference image
From
The Rembo Wizard's main menu,
select

and restore the reference system on the new "C:" partition.
Boot the system and format the data partition
 The Rembo Wizard
does not operate but with the system partition. The new, second (data)
partition will sure get the drive letter "E:" allocated when the
system boots, but the partition is not formatted. Start the The Rembo Wizard
does not operate but with the system partition. The new, second (data)
partition will sure get the drive letter "E:" allocated when the
system boots, but the partition is not formatted. Start the
 , ,
 , ,
 . The
resulting disk partitioning as seen by Windows 2000 is illustrated below,
showing also the reserved disk space for the optional Rembo OS' multicast
operations disk cache. . The
resulting disk partitioning as seen by Windows 2000 is illustrated below,
showing also the reserved disk space for the optional Rembo OS' multicast
operations disk cache.

Right click on the "E:" to format the new data partition for NTFS.
Create a new base image
You would probably make some other adjustments in the system, related to
the new data partition and its usage. Anyway, it is good idea to take a
new base image from the system with the new partition active.
You would take an Administrative backup, overwriting the old, single
partition system's base image. Make sure that you have the original base
image on a safe place before destroying the old image from the server.
Optionally copy the base images for individual hosts
Take a moment to consider what will be the target group's architecture.
Are all hosts different as in Group A of below example, or all hosts
identical as in Group B?
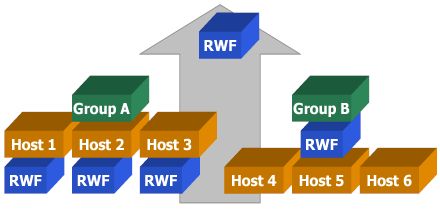
Group A: Copy the base image in the host scope of each installed
system - MAC-address/hdimages
Group B: Copy the base image in the group scope of each installed
group - group-name/hdimages
Remember to keep the base image and the autoload-file (with the
partition table signature) in a safe place, other than the Rembo Server's
file system. Download it on a DVD-RAM disk, for example.
18 Nov 2002
|